Long-term thermal drive KLIMAT-100 for opening doors and vents of greenhouses
Description
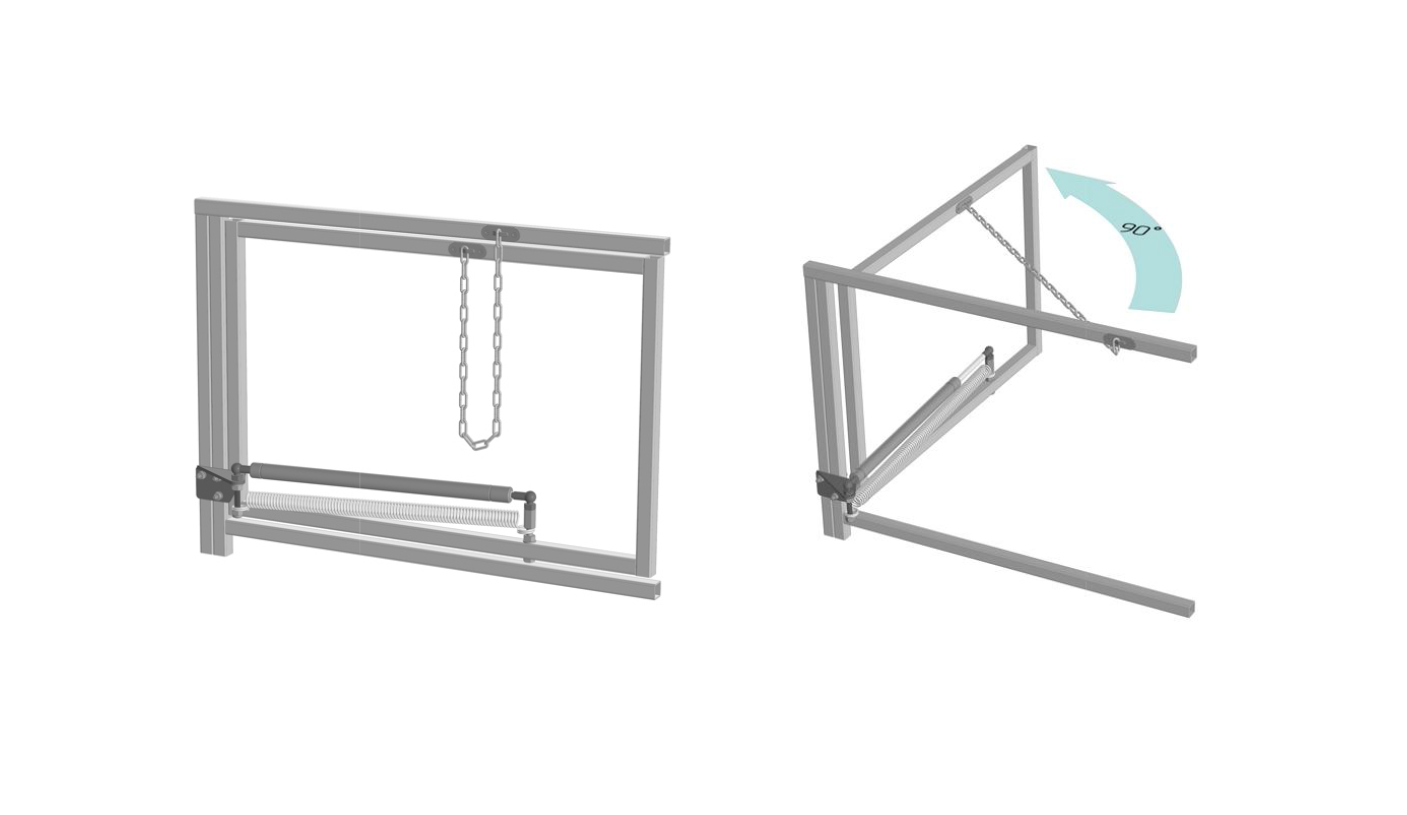
The thermal actuator is characterized by increased resistance to wind loads (rod diameter is 10 mm!). The temperature of the beginning of the opening of the thermal actuator is 20 degrees C, full opening at 28-30 degrees C, full closing at 20 degrees C. The length of the rod extension is 10 cm, which allows you to open the door or vent of the greenhouse by 90 degrees. A distinctive feature of this thermal actuator is that it allows the summer resident to forcibly open the greenhouse door (for example, in the evening, when the temperature has dropped and the thermal actuator has closed the greenhouse, but you need to go in and take something or water the plants). The "Climate-100" thermal drive belongs to a series of reinforced ventilators with increased strength. The following openers are analogous to this drive: Vent L 001, Comfort Aero-100, Thermal Drive 400.
Characteristic
| Country of manufacture | CN | Working stroke | 100mm |
| Condition | New | Force | 100kg |
| Color | Black | Temperature adjustment range | 18-32℃ |
| Rod diameter | 10mm | Dimensions | 345*22mm |
| Operating principle | Thermal actuator with spring return | Cylindrical shell material | Steel |
| Packing size | |
| Weight | 1.1kg |
| Height | 60mm |
| Width | 60mm |
| Length | 500mm |
| Packing | Carton |
INSTALLATION AND OPERATION MANUAL
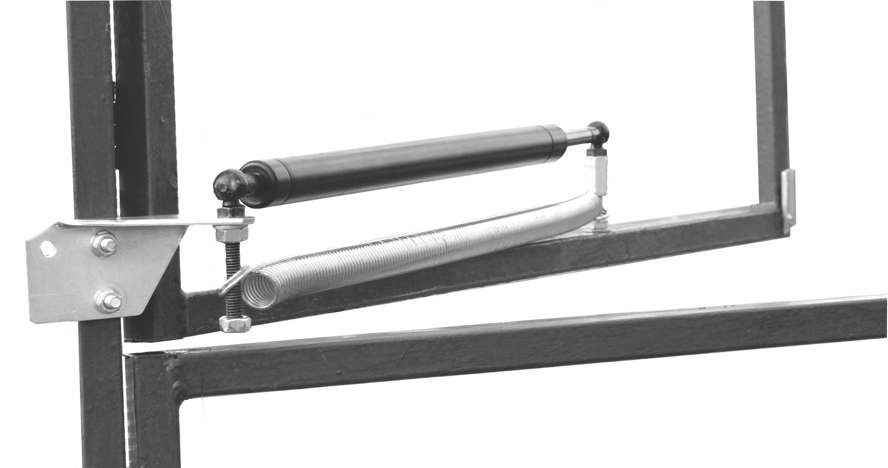
*Easy to install - the vent opener can be mount onto and screwed onto the greenhouse frame. The complete mounting kit includes all the parts necessary for installation.
*The vent opener "Klimat-100" allows you to force doors to open (for example, in the evening or in the morning, when a greenhouse is closed by the actuator, you can open the door and go in/out without any problems). This feature distinguishes “Klimat-100” from many other types of automatic window actuators.
2.Specifications
| Parameter | Value | Parameter | Value |
| Storage temperature | -500 … +600 C | Max. lifting force | 100 kg |
| Cylinder size (L x O.D.) | 345 х 22 mm | Standard Color | Black |
| Rod size | 10 mm | Material | Construction Steel |
| Rod travel distance | 0 - 100 mm | Temp. range | +20… 180C (full closing) |
| +320C (full opening) | |||
| Total length of actuator assembly | 500 mm (extended rod) | Rod stroke depending on temperature | ≤ 200C – 0… 10 mm |
| 20-240C – 20… 40 mm | |||
| 400 mm (retracted rod) | 25-310C – 40... 70 mm | ||
| ≥ 310C – 70… 100 mm | |||
| Mounting bracket | Made of Stainless steel | Adjustment | Not required |
| Max. opening angle | 800 (depending on settings and load) | Parameters tolerance | 10-15% (depends on ambient temperature) |
| Mass assy | 1,1 kg (2,425 lbs) |
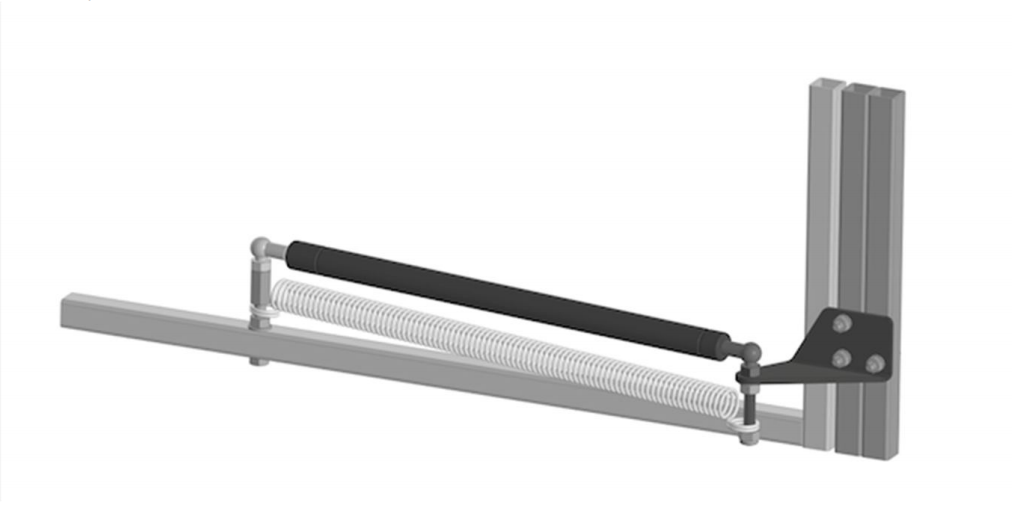
3. Parts list (supply package)
One set of an automatic vent opener includes the following parts pointed in the picture below.
1. Design (purpose)
*This product is designed for cold frame, greenhouse windows, doors and half-doors. Automatic vent opener opens and closes greenhouse window as the temperature changes automatically. It maintains the best growing temperature and prevents greenhouse from overheating.
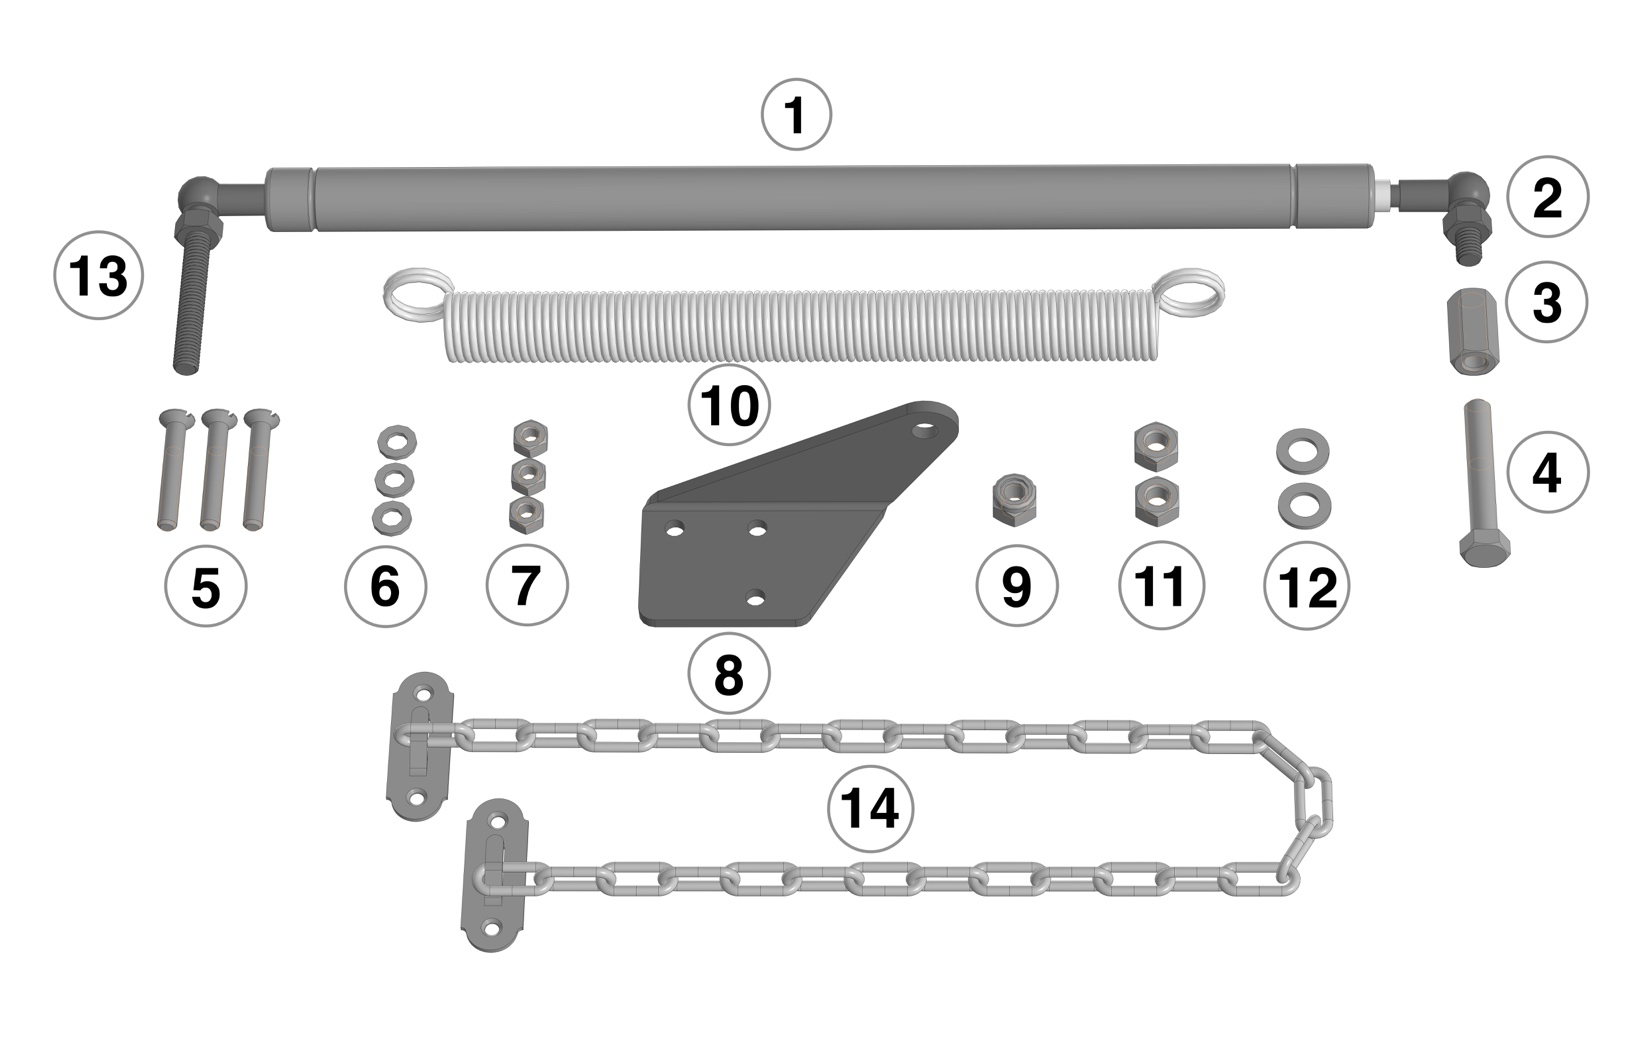
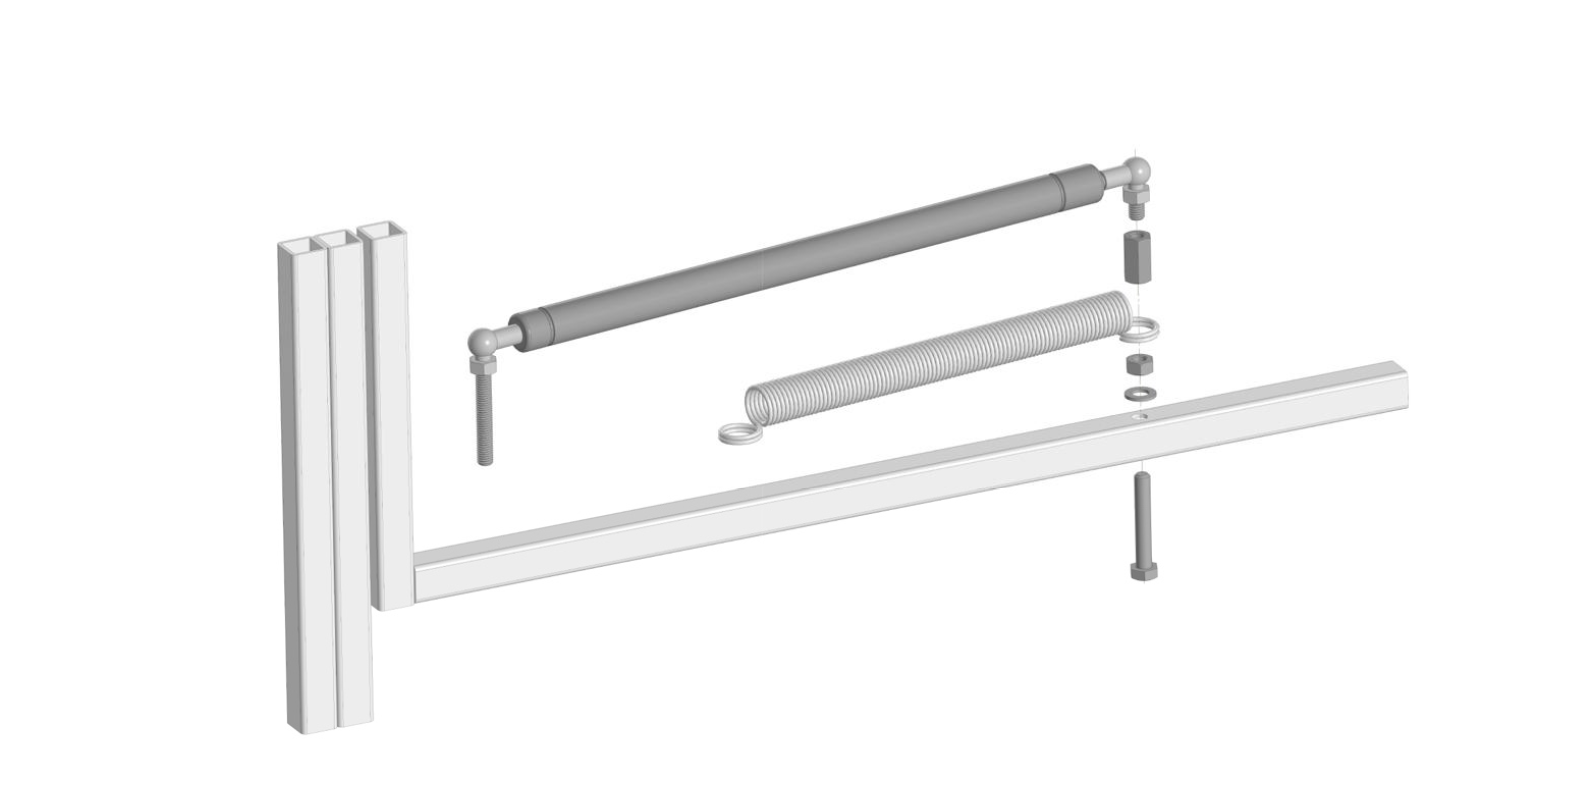
1. Acting cylinder 1 pc. 8. Mounting bracket 1 pc.
2. Ball joint M8X10 1 pc. 9. Lock nut M8 1 pc.
3. Coupling nut M8 1 pc. 10. Closing spring 1 pc.
4. Hex. Bolt M8x50 1 pc. 11. Screw nut M8 2 pcs.
5. Screw M6 3 pcs. 12. Washer 8/16 2 pcs.
6. Washer 6/12 3 pcs. 13. Ball joint M8x50 1 pc.
7. Screw nut M6 3 pcs. 14. Limiting chain 1 pc.
4. Mounting (assembly instructions)
To mount the actuator you will need spanners with width across flats 10, 12, 13 mm or one adjustable wrench, screw gun or drill and drills for metal 6 mm and 8 mm, marker or pen.
Follow the next steps for fitting the unit.
Step 1: Preparing the acting cylinder for fitting.
Prior to fitting the Automatic Vent Opener, the acting cylinder has to be cooled. Place it in a cool area (e.g. in a cold room or in cold water) with temperature +10…+15°C for approximately 40 minutes. Then mount the black ball joints: ball joint M8x10 should be fitted on the rod and ball joint M8x50 - on the threaded pin of acting cylinder.

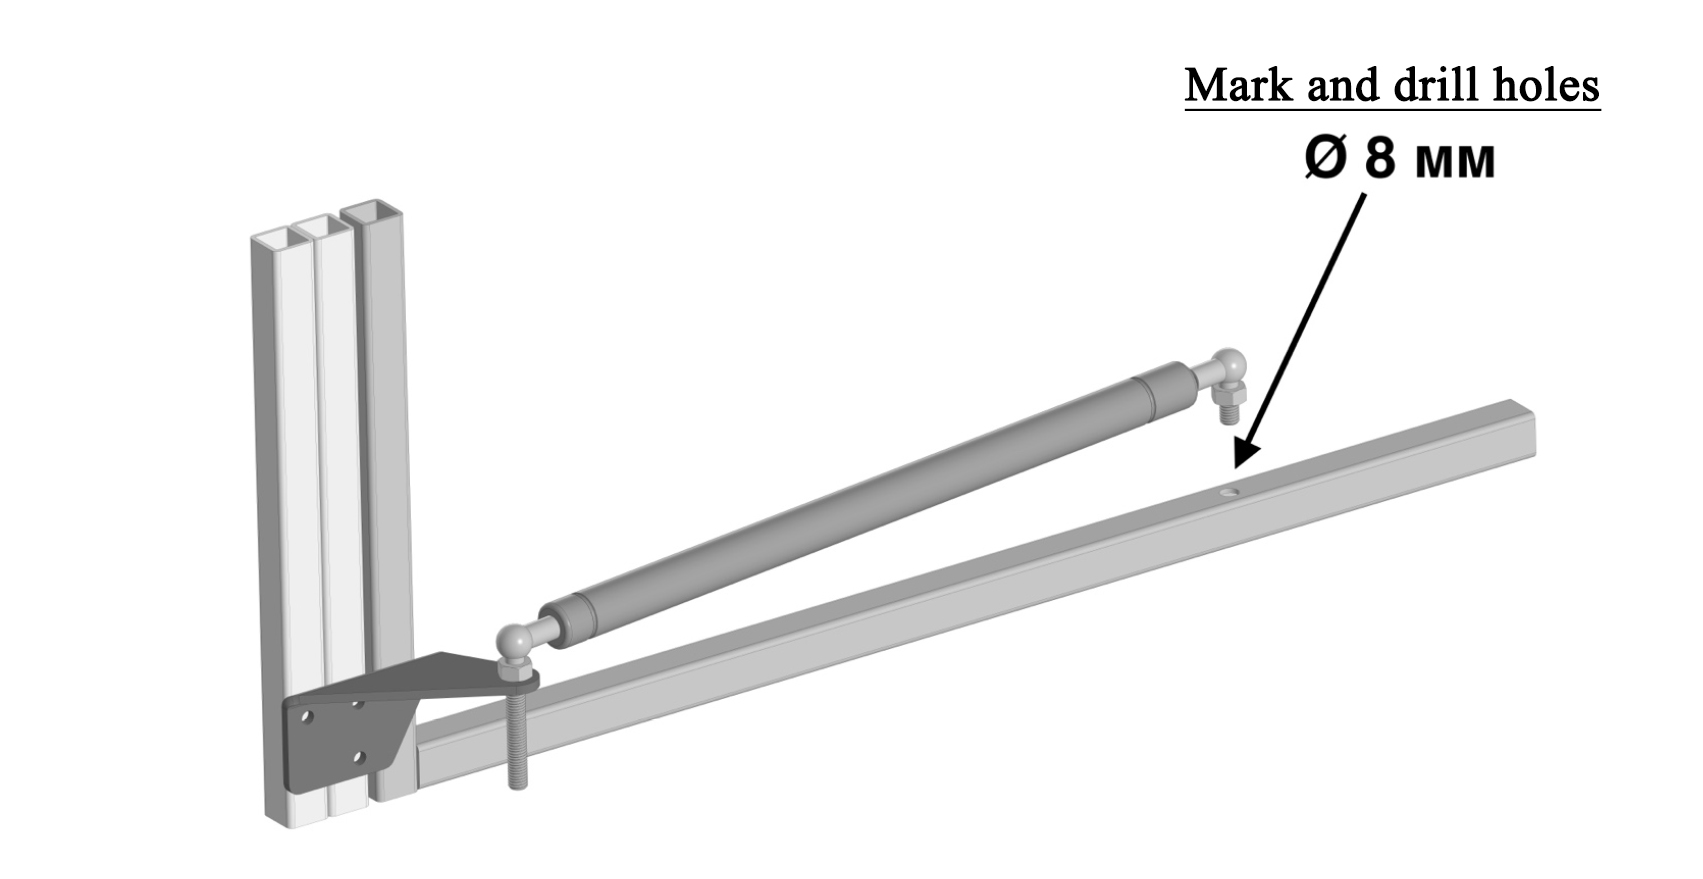
Step 2: Drilling a hole for the M8 bolt on the greenhouse sash.
In order to understand where to drill the hole, you need to ATTACH the mounting bracket "BY EYE" to the planned place of its attachment and mark the point opposite the short hinge where we will drill the hole. (At this stage, we do not install the mounting bracket!). Drill a hole with a diameter of 8 mm.
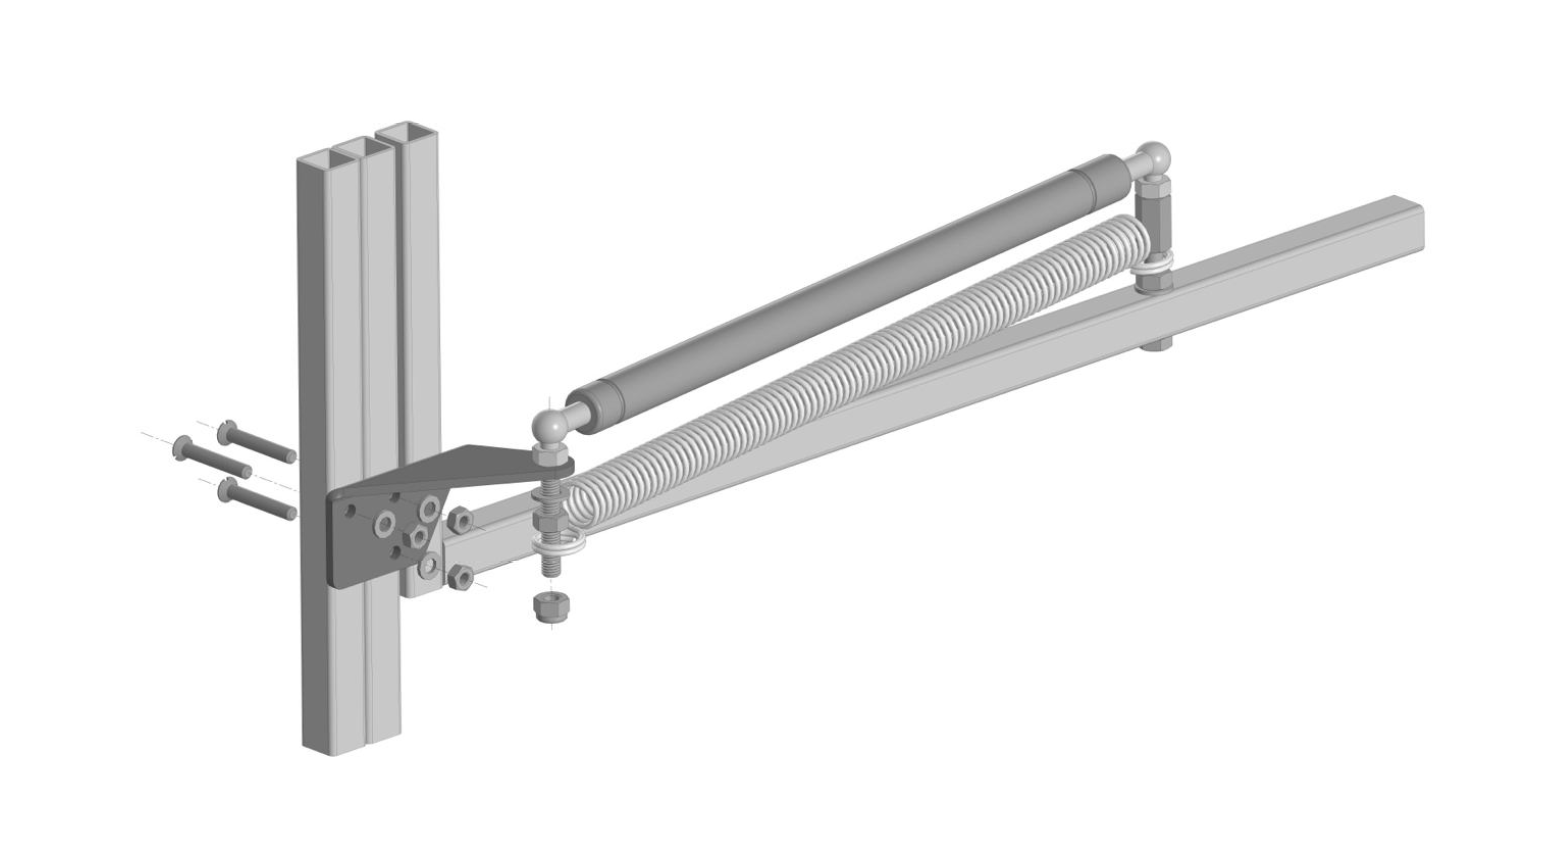
Step 3: Fastening the right drive unit.
Insert the bolt (4) into the resulting hole, put the washer (12) on it and screw on the nut (11). Then put the spring ring on the bolt and screw on the connecting nut (3). Next, screw the black short hinge into the connecting nut. (The hinge must be screwed in completely - along the entire length of its thread). Tighten all the nuts firmly with wrenches.
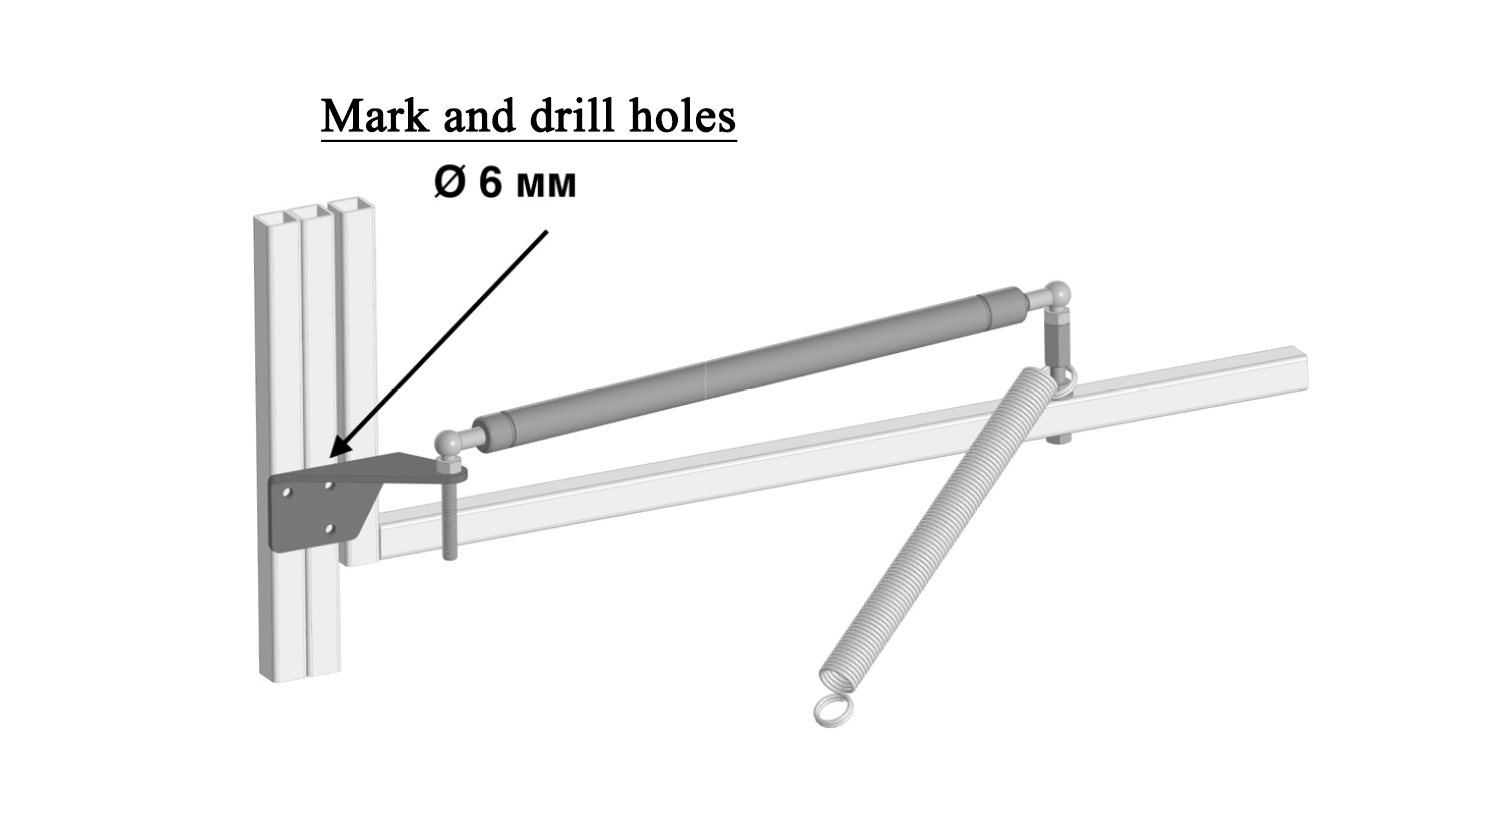
Step 4: Drilling holes for fastening the corner.
Insert the black long hinge into the eye of the steel corner. Then place the corner with your hand to the planned place of its fastening on the greenhouse frame, align the thermal drive by eye and mark the drilling points for fastening the corner. Drill holes with a diameter of 6 mm.
Step 5: Fastening the corner and completing the installation of the thermal actuator.
Screw the corner with two/three screws (5) (depending on the greenhouse design), washers (6) and nuts (7). Insert the long black hinge into the corner hole, firmly fix the hinge in the corner eye with a washer (12) and nut (11). Next, put the spring ring on the long hinge. Screw the nut (9) with the lock facing down onto the remaining lower part of the thread of the long black hinge. Tighten all connections firmly with wrenches.
Step 6: Installing the limiting chain.
Install the limiting chain so that when the sash is opened by 80-90°, the chain is fully taut. The limiting chain will protect the thermal drive and the greenhouse sash from damage during squalls and hurricane gusts of wind.
Note:
We recommend that you immediately drill a second hole, at a distance of 2-3 cm from the first.
The fact is that in early spring the temperature changes very quickly, by evening it gets colder and the thermal actuator does not have time to close the greenhouse - the liquid in the thermal actuator crystallizes due to the low temperature and does not allow the rod to retract completely (This applies to absolutely any thermal actuator, not only Climate 100). Therefore, for the early spring period, you can use this second hole - the opening angle of the door/window will be smaller, but the thermal actuator will have time to close your greenhouse completely.
5.Operation
To extend the service life and prevent breakdowns of the thermal drive, it is recommended to install a door/window opening limiter in the cable/lanyard to reduce loads during sudden wind breaks.
It is strictly forbidden to lock the sash on which the thermal drive is installed. This will lead to damage to the device.
For the winter period, it is recommended to clean the thermal actuator from dirt (wipe with a damp cloth) before the end of the operating season. Lubricate the ball joints with grease, or lubricate with technical grease (IITOL/SALT). Store the thermal actuator in a room with a constant temperature.
6.prohibited
* Disassemble the thermal actuator hydraulic cylinder
* Clean the movable rod with abrasives
* Heat the thermal actuator above +60 °C (immerse in hot water, on a stove, radiator, with a building hair dryer, etc.)
*Forcibly close the doors with the thermal actuator installed on them (also, do not close the rod with a force exceeding 100 kg)
* Close the vents, transoms, doors with a latch/bolt with the thermal actuator installed on them. We recommend removing all locks and bolts immediately upon installing the thermal actuator.
7.Useful tips
*If the head of the standard M8x50 bolt does not fit into the gap between the greenhouse sashes, we recommend purchasing an M8x50 bolt with a countersunk head (sold in any hardware store) and using it instead of the standard one.
* The Climate 100 thermal actuator can be installed on both left-hand and right-hand sashes. To install on a right-hand sash, simply turn the steel angle upside down.